在疫情这两年准备英语留学的事儿,反而少了写作。生活逐渐的回归到正轨,写作是一个好的习惯,还是坚持起来。在整理和收集的过程中,自己会不断的思考,也是在加强和锻炼的过程。所以打开了尘封已久的博客网站,发现博客框架升级了大的版本,产生了一些BUG需要修复。在过去使用markdown进行排版的时候并没有很规范,也在这个过程将278篇文章整理一下。本篇文章记录部署的过程以做后续的查看。最终使用的技能栈为 GithubPages + HEXO + NEXT + VsCode + PicGo。更新为 GitHub 的 action 自动触发的另一个好处是可以在网页上直接进行编辑,会自动编译发布。
下载最新的 node 和 npm 版本
本篇文章更新的时候,node 为 18.12.1,npm 为 8.19.2。网上有很多不同的安装攻略,请按照自己喜欢进行选择。
- 官网的链接为 (https://nodejs.org/en/)
- 常使用MAC系统,默认是使用命令
brew install node。 - 但是有多版本的需求,最终使用
nvm进行管理多版本。下载最新稳定版本nvm install --lts,使用最新版本nvm use --lts。
创建 Github 仓库并下载到本地
1 | git clone [email protected]:ucfyao/blog.git |
使用 hexo 静态博客框架
安装 hexo 脚手架
1 | npm install -g hexo-cli |
先把blog的.git文件挪移出去,不然初始化会报错。然后使用命令进行初始化。
1 | hexo init blog |
创建一篇文章进行预览。
因为我之前有很多的文章,直接将source下面的文件,迁移到初始化后新框架即可。
1 | hexo n 第一篇文章 |
生成静态文件:
1 | hexo g |
启动服务器进行查看:
1 | hexo s --debug |
常用的hexo命令:
1 | npm install hexo -g # 安装Hexo |
更换主题
我选择的是next主题。官网中还有很多可以选择。使用以下命令将主题下载到themes文件夹中。
1 | git clone https://github.com/iissnan/hexo-theme-next themes/next |
下载完毕后修改主目录下的主题配置 _config.yml:
1 | theme: next |
如果主题需要更新,可使用git的方式:
1 | cd themes/next |
主题优化配置
统计数字
1 | npm install hexo-symbols-count-time |
在主配置文件中修改:
1 | symbols_count_time: |
在主题配置文件中修改:
1 | symbols_count_time: |
添加站内搜索
安装插件
1 | npm install hexo-generator-search |
编辑站点配置文件,添加以下内容
1 | search: |
编辑主题配置文件,设置 local_search 为 ture。
SEO 支持
1 | npm install hexo-generator-sitemap --save |
根目录配置文件添加:
1 | # SEO |
主题配置文件修改:
1 | baidu_push: true |
点击时候出现烟花特效
1 | npm install next-theme/hexo-next-fireworks |
首页显示缩略内容
这里最新的next7版本修改了新的写法,之前的配置不可用了。
1 | auto_excerpt: |
现在只能打开开关,使用在md文件中表头部分添加 description 或者使用 <!-- more -->进行截断。
官方 更推荐使用 <!-- more -->进行截断的方式。那么原来的文章中都需要添加,这就麻烦了。
点击阅读更多进入文章页面,会跳到#more开始,个人感觉是不合理的,所以替换了下面这行:
1 | <a class="btn" href="{{ url_for(post.path) }}" rel="contents"> |
加速
通过在空闲时间预取in-viewport链接来加快后续页面加载速度。
1 | npm install --save quicklink |
自动加空格
1 | npm install pangu --save |
修改主题配置文件
1 | # Pangu Support |
添加rss
1 | npm install hexo-generator-feed --save |
懒加载
安装插件
1 | npm install lozad --save |
修改主题配置文件
1 | # 图片懒加载 |
开启 Pjax 加速
Pjax 主要用于加速 Web 页面的切换速度,同时也可以用来解决 Aplayer 音频播发器切换页面后播放出现中断的问题
1 | npm install pjax --save |
顶部进度条
1 | git clone https://github.com/theme-next/theme-next-pace source/lib/pace |
编辑主题配置文件:
1 | pace: |
阅读进度条
1 | # Reading progress bar |
标签云
1 | # 我觉得不好看,就没配了。如有需要可以自行搜一下。 |
其他配置
1 | # 代码复制 |
GitHub Actions 自动化部署
在默认的方式中,hexo d 会将 hexo g 生成的静态文件发送到远程的repo,然后通过访问默认的 <username>.github.io就可以进行访问了。但是每次都需要同步两个库就比较麻烦。CICD的方式自动化部署才是程序员的最爱。我们期望的效果是本地仓库直接push,触发 GitHub Actions 自动构建发布。
安装相关插件
1 | npm install hexo-devloyer-git --save |
添加配置
1 | deploy: |
执行部署
执行完毕后,生成的静态文件应该就会发布到GitHub的仓库中,就可以使用 xxx.github.io 进行访问了。
1 | hexo clean && hexo g && hexo d |
注意:在部署的时候,如果没有添加过secret key,可能会提示你输出账号密码。我在开发中经常使用的方式是添加secret key 到GitHub中,避免每次输入账号密码比较麻烦。详细步骤可以参考我之前的文章,GitHub 官方文档写的也很详细。
绑定个性域名
- 个性的域名有助于更好的被记住。可以在域名代理商处购买一个自己喜欢的域名。比如我的个人博客域名为: yaozihao.com。
- 在购买域名后,可以登录后台,将购买的域名添加解析指向到
xxx.github.io。添加三条解析记录,其中两个是GitHub的IP地址。你也可以ping你的http://xxxx.github.io的ip地址填入进去,比如:192.30.252.153。有一个记录类型是CNAME,CNAME的记录值是:xxx.github.io。 - 在项目根目录
source下创建文件CNAME,内容为域名:yaozihao.com。
设置自动部署
参考官方推荐的文档。
在GitHub的项目库
xxx.github.io中找到settings。使用以下命令创建一对公私钥:
ssh-keygen -t rsa -b 4096 -C "$(git config user.email)" -f gh-pages -N ""在
xxx.github.io的setting页面中找到Security=>Deploy keys将生成的公钥 *.pub 添加。在
blog的setting页面中找到Security=>Secrets=>Actions将生成的私钥添加。名字DEPLOY_KEY要和yml中的一样。在项目中建立
.github/workflows/pages.yml,并填入以下内容 (获取到node版本进行替换):1
2
3
4
5
6
7
8
9
10
11
12
13
14
15
16
17
18
19
20
21
22
23
24
25
26
27
28
29
30
31
32
33
34
35
36
37
38
39
40
41
42
43
44
name: Pages  # workflow name

on:
  push: # 触发事件
    branches:
      - main # default branch

jobs:
  pages: # job1 id
    runs-on: ubuntu-latest # 运行环境为最新版 Ubuntu
    steps:
      - uses: actions/checkout@v2 # step1 获取源码  # 使用 actions/checkout@v1
      - name: Use Node.js 18.x # step2
        uses: actions/setup-node@v2
        with:
          node-version: "18"
      # Caching dependencies to speed up workflows. (GitHub will remove any cache entries that have not been accessed in over 7 days.)
      # 缓存压缩 node_modules,不用每次下载,使用时解压,可以加快工作流的执行过程,超过 7 天没有使用将删除压缩包。
      - name: Cache NPM dependencies
        uses: actions/cache@v2
        with:
          path: node_modules
          key: ${{ runner.OS }}-npm-cache
          restore-keys: |
            ${{ runner.OS }}-npm-cache
      - name: Install Dependencies  # step3 name
        run: npm install # 安装 node modules 相关依赖
      - name: Build
        run: npm run build

      # Deploy hexo blog website.
      - name: Deploy
        id: deploy
        uses: sma11black/[email protected]
        with:
          deploy_key: ${{ secrets.DEPLOY_KEY }}
          user_name: name  # (or delete this input setting to use bot account)
          user_email: email # (or delete this input setting to use bot account)
          commit_msg: ${{ github.event.head_commit.message }}  # (or delete this input setting to use hexo default settings)
      # Use the output from the `deploy` step(use for test action)
      - name: Get the output
        run: |
          echo "${{ steps.deploy.outputs.notify }}"
然后将项目push上去,就会自动触发github 的 action 功能。
这里有两点需要注意,github 仓库中现在不能够上传其他库的.git。需要进行忽略或者删除。如果出现执行失败,可以将该文件添加到
.gitignore中或者删除。
1 | themes/next/.git/ |
设置图床
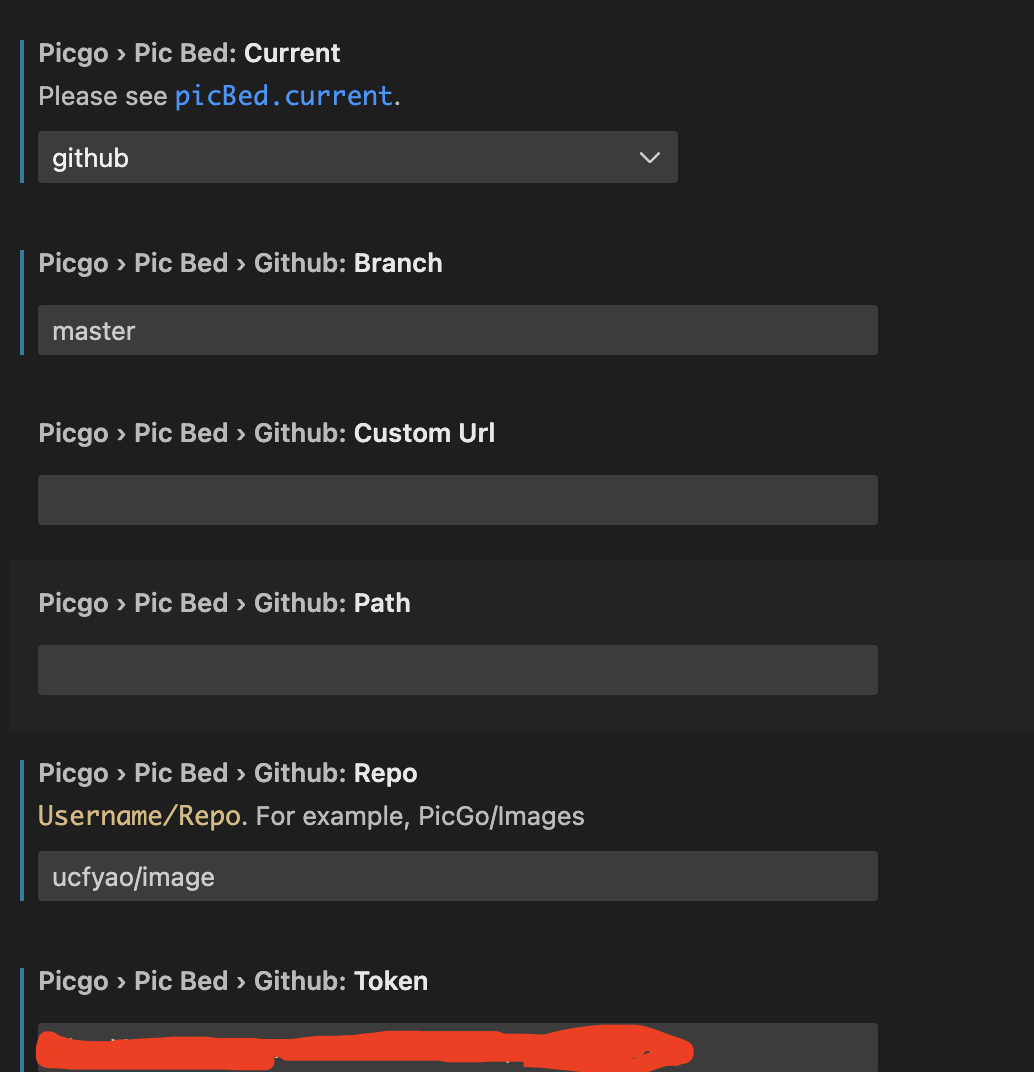
图片默认是放在 image 目录下的,但是访问速度比较感人,每次插入的时候也是很麻烦,可以使用图床解决这个问题。推荐使用 vscode + picgo + github 的免费白嫖图床。
创建图片仓库
在github上创建新的仓库存放图片,仓库必须是public的,否则存储的图片不能正常访问。注意现在默认的主分支都是main。
Vscode 安装并配置插件
查找 picgo 插件进行下载。然后进行vscode配置:官方文档。也可以从官方文档下载客户端。
- 配置uploader,选择github。
![20221129150551]()
- 打开MD文件,粘贴一个图片。
- mac 使用快捷键 Cmd + Opt + U从剪切板上传图片。